
Saturday, November 12, 2011
Komara - Siding
We started to install the siding. The pattern that I like to do is a little complicated in that it is a mix of horizontal planks, board & batten and a third material that is either cedar shakes or poplar bark. I like to mix materials to give a depth and character to the home. It is one way to make a simple structure more unique. For this house we use a cedarmill hardiboard material for most of the siding, wood for the trims and we will be using poplar bark for the accent areas.
Friday, November 11, 2011
Word - Update
Today at the site the backfilling has been in progress and the infilling between the retaining wall and the house. There is a lot to consider in this house while doing this work with water and power to the house, drainage lines for foundation water run-off and lines for future downspouts, catch basins installed, gravel over the foundation drains with filter fabric to insure water flows away from the house and the retaining wall.
 10/03/2011
Also the slabs were formed for the fireplaces on the main level and connector porch. The flue from the basement fireplace needed to come up and by-pass the firebox of the main floor fireplace so again, a lot of complicated figuring out the details to make sure the everything fits in the space allotted.
 11/11/2011
 10/03/2011
 11/11/2011
Thursday, November 3, 2011
Word - HVAC
Today at the site I had to meet with the HVAC subcontractor to go over the possible layout of the system so that he could determine the cost of the system and we could find out where we would need to drop ceilings, create duct chases, put floor registers and return air ducts, set the air conditioning units and set the HVAC units. The codes on HVAC duct work have changed fairly recently that increased the amount of insulation on the duct which in turn created more difficulty in hiding the ductwork.
While I was there I reviewed the rockwork which is looking great, looked over the basement fireplace that passed inspection today and looked at the building of the kitchen screen porch room. Everything is looking great. We wanted to get some backfilling done but an early rain has delayed that work for now.
While I was there I reviewed the rockwork which is looking great, looked over the basement fireplace that passed inspection today and looked at the building of the kitchen screen porch room. Everything is looking great. We wanted to get some backfilling done but an early rain has delayed that work for now.
Tuesday, November 1, 2011
Word - Update
The mechanical phase can be a difficult time for clients to make decisions. Mechanicals are important and not something that most people feel comfortable making decisions about or understanding and there are a lot of decisions to make. It is wise for the client to try to educate themselves to the different types of heating/cooling systems available. It's never too soon to start to think about this phase of the job so as soon as you know you are going to build a new house you should take the time to read about your heating and cooling, water heaters and even lighting options.
Kurnick - Preconstruction work
I've been waiting on the client to get his construction loan in place so that we can start the foundation work. In the meantime, I took the plans into the building department for plan review and to obtain a permit. I also had Duke Power evaluate the power situation. There are two power transformers that my client could tap into, one closer than the other but I wasn't sure if there is a tap-in position available in the closer transformer, luckily there is so we are going to set a temporary power pole next to that transformer and then I will need to call in to inspect the temporary power pole. Once that is approved, we can get a power connection. While we wait on the inspection we will get a jobsite box set up with the permit in place and a port-o-john. Those things need to be in place before the inspection.
Thursday, October 27, 2011
Word - Deck Stairs
The stairs off of the back deck/connector is very complicated. In order to keep within the natural looking theme we decided to use locust post and locust 1/2 tree treads. We stripped the trees of their bark because the locust trees were cut in the summer and that often means that the bark will likely fall off over the course of a year anyway. The trees will get treated with a solution to gray them down to a more weathered look. Locust wood is a good wood to use outside and exposed to the elements the wood is so dense and resistant to decay. They are also - heavy! Getting the trees cut down out of the woods, hauled to a truck, in the truck, to the jobsite, out of the truck, to the site location where they will be installed, stripped and installed, requires a lot of man power and should not be taken for granted. Using natural products usually has a hassle factor that you don't have when you go to the lumberyard and pick up a 2x but the look is undeniably unique. 10/31/2011
 10/31/2011
Wednesday, October 26, 2011
Word - Rockwork
The client and I discussed the look we both wanted to achieve for the rockwork on the outside of the house and we were on the same page from the very beginning, wanting the rock to look very natural, organic and rustic. The rock I selected is a local stone and not typically used for this application but I wanted a chunky feel and I think my mason's are doing a wonderful job in executing the vision. Dealing with rockwork is not an easy task, especially on this job. As I've mentioned in past entries this particular site is very limited on staging areas and space. Rock needs to be delivered and staged as close to the area that it will be installed as possible, moving rock around the site is not much fun for anyone. Not only do you have to consider the rock pile but also a pile of sand and the pallet of mortar, all should be placed as close to the area that it will be installed if possible.
 10/26/2011
 10/26/2011
 10/26/2011
 10/26/2011
Sunday, October 23, 2011
Word - Siding
The client decided to construct awnings over the windows on the backside of the house to eliminate the sun heating up the house during the peak of the day in the summer. We had to come up with a detail that would be in keeping with the look of the rest of the house. I had a local sawmill mill the timber to a specific size to fit the look I wanted to achieve. He also milled 1" material for the roof sheeting. The awnings were then installed, knotched around siding and flashed properly to insure no future water intrusion. Whenever you add details to the outside of the house you invite a potential for water to find a way in or sit on a surface and cause rot. it is important to always think about those details when designing those special elements on the house.
 10/23/2011
 10/23/2011
Wednesday, October 19, 2011
Komara - Windows
We have installed most of the windows and doors for the house. I usually specify a window that is aluminum clad outside and pine wood inside. I like the aluminum clad because in my opinion it is one of the most weather resistant materials to use. We have temperatures here that can swing from hot to cold (more cold then hot) and the aluminum clad hold up to temperature changes and retains the color well with very little fading. I also like to use a casement window vs. a double hung. There are occasions that a double hung is preferred, like space issues outside if a window opens up to a deck, but a casement window is more energy efficient than a double hung.
 10/19/2011
 10/19/2011
Komara - Framing
For the carport in the front of the house we used locust post as our support. The client wanted the front of the house to reflect the fact that it's build in the mountains. Locust is a tree with a dense wood grain and is one of the most weather resistant woods to use in it's natural state in our area. Most of the time, clients like to see the bark on the wood when used outside but unless the locust tree is cut when the sap is down, which means colder weather, the bark is likely to fall off the tree after a year or so.
Attic trusses were used to frame the roof of the carport. An attic truss is built with a larger bottom cord to allow for the additional weight of items being stored or someone walking on the floor. The area in the middle of an attic truss is left open for storage. This type of truss is more expensive than a standard truss with no center opening or beefed up bottom cord.
 10/19/2011
Thursday, October 13, 2011
Komara - Framing
The handrail on the back deck is a standard 2x2 picket with top and bottom rails but the client wanted something special inside the screen porch area so for that section of handrail we used mountain laurel pickets. Mountain laurel is a natural growing flowering shrub in our region and the wood is very dense. The shrub is all over but typically if any laurel is growing on a lot that I am clearing, I have it cut down first and stacked to be used inside the house if the client chooses to use that detail. Cutting the laurel is very hard, the wood is dense and the branches are curvy so if you haven't worked with it before it can be dangerous to cut if the blade binds up as your cutting the wood.
 09/27/2011
 10/13/2011
 09/27/2011
 10/13/2011
Wednesday, October 12, 2011
Word - Retaining Walls
We had to form and pour retaining walls in front of the house to hold back the driveway and parking area from the front yard of the house. The site was so steep that we had to find a "happy medium" elevation so there were not to many steps down to the backyard or out the front door up to the parking. If we had pulled the house entry level with the driveway it would have required nearly 10-12 steps out of the basement door and onto the backyard. We tried to split the difference by stepping down to the front door from the driveway 5 or 6 steps and then out of the basement door 5 steps to the back. That did create the extra cost of the additional retaining wall since typically the house basement wall usually doubles as a retaining wall for the parking. In addition we needed to incorporate a way to get down the the existing path to the guest cabin and a level walkway to the screen porch from the front yard.
Having to consider all of these aspects as well as how the power lines, water lines, gas lines and downspout and water drainage will work it's way around or through the retaining wall is something that must be very well planned and executed before the pour. It took several meetings with the concrete guy, my brother and my main crew leader on the job to make sure everything had been considered. The retaining wall was engineered and inspected before pouring.
 10/12/2011
 10/12/2011
Sunday, October 9, 2011
Komara - Framing
The roof connection of the back porch and house was framed using exposed valley rafters. The client wanted to see that vault in the roofline inside since the fireplace and chimney would be built up the wall toward that porch roof peak. It also allowed us to install two triangle windows on either side of the chimney. Building exposed valley rafters is a more expensive framing technique both in lumber and in labor. The valley rafters use a larger framing member and the labor to cut each rafter with a compound miter is more time consuming.
 10/09/2011
 10/09/2011
 10/09/2011
 10/09/2011
Friday, October 7, 2011
Kurnick - Clearing the site
The clearing and excavation of the site is being done. Luckily there are not very many big trees on the lot because all of the stumps need to be removed and that can take the most time and they are costly to haul off to a dump site. Usually you have to pay someone to dump your stumps on there site and they dispose of them however they choose, either bury or burn. Stumps can take days and days to burn down so it isn't often something you want to do on site because of time constraints, future trees being damaged by the fire or maybe the development has rules against open burning.
Some of the trees that we took off the site were hickory trees so I did have them hauled down to the local sawmill. If the client is interested we will likely saw them into planks for flooring but I know we will not have enough to do any major section of floor. Also, in order to do this the tree needs to be sawed as soon as possible, stickered and covered to dry out over the course of construction before installation.

Some of the trees that we took off the site were hickory trees so I did have them hauled down to the local sawmill. If the client is interested we will likely saw them into planks for flooring but I know we will not have enough to do any major section of floor. Also, in order to do this the tree needs to be sawed as soon as possible, stickered and covered to dry out over the course of construction before installation.

Wednesday, September 28, 2011
Word - Framing
It took a while of back and forth to decide what the roof of the connector was going to be constructed from, antique beams or lumber that we cut ourselves. Of course we knew that we would save money if we could cut the lumber ourselves or have it cut at the local lumber yard but could we achieve the look we wanted and match the exising antique log cabin that everything has been built around. After several test of lumber scraps and solutions to make the timber look older we decided we wanted to do it ourselves. That allowed the most flexibility and I think the end result was perfect. The color matched the existing log cabin exactly and the look is exactly what we were going for in that it looked like it was built years ago from the materials that were available with local materials. I decided to leave the natural edge on the bottom to give the beams a more authentic look.
 09/28/2011
 10/06/2011
 09/28/2011
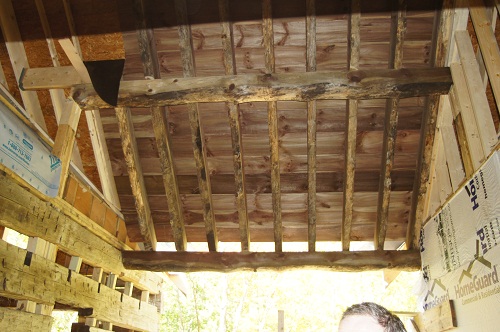 10/06/2011
Word - Windows
The windows were delivered and installed and true to many other aspects of this job, it wasn't easy. The driver of the truck got stuck before he even made it to the site and then he had to park the truck at the gate of the clients drive. The drive is approx. 800' long, going up a steep incline and then back down to the house site. The hill was too steep for his truck which was not four wheel drive. We had to have my brother there with the flatbed truck to load the windows from the box truck onto the flat bed, haul them to the house and then unload them across a 3' wide walking plank from the drive into the house. The greatroom window was by far the heaviest window and the most scary to manuver over the maze of obstacles. The myriad of potential outcomes that run through my mind the night before is what keeps me up at night. Luckily I work with crews that understand the obstacles and realize how important it is to go slow and treat the materials with care.
 09/28/2011
 09/28/2011
Kurnick - Septic install
We started to install the septic field today. It's good to get the septic field in first because it's on the far side of the house so once the foundations are in the path to the side of the house for the septic get's more difficult to access. Thankfully, no hidden surprises of rock so all is well and the septic field and setting of the tank goes in like clockwork. The field and tank need to be inspected by the Jackson County Department of Environmental Health before covering up to ensure all is installed properly
 9/28/2011
 9/28/2011
Monday, September 26, 2011
Komara - Framing
Setting the glulam beams that support the roof. I used a structural roof support system called perlins. Perlins support the roof, not at the ridge but down lower on the rafter length which requires two beams instead just one ridge. In this case we were unable to use one ridge because the span was so great to size one ridge beam would have been impossible. The perlins were sized by my supplier's in house engineer. I often feel they over estimate the size of beams like this but if you factor in the cost an engineer charges to size the beam and sign off on the paperwork, the cost difference could be minimal. If the size of the larger beam is a problem then I would suggest getting an engineer to size it because they will likely be more accurate as to what is needed for your specific application.

Wednesday, September 14, 2011
Komara - Framing
The exterior stud walls and interior stud walls are going up and properly braced in case we get some heavy winds. The exterior walls are 2x6 studs with 1/2 osb sheathing. All window openings are in with proper headers. We build our headers by sandwiching (2)2x's with sheets of blue board or rigid insulation in the middle. That helps cold air from being able to transfer easily through a solid wood header.
 09/14/2011
 09/14/2011
Monday, September 12, 2011
Recession Depression - Material problems
I just got off the phone with my building supplier/engineer, who is sizing some beams for the roof of one of my projects, and he informed me that because of the size of the beams that I need and the lack of production I might have problems getting the beam. The beam is sold by the foot and they have one coming in that is 60' but I don't need 60' I only need 45'. That means I would be paying for 15' that I don't need and the likelihood of getting the beam in size I need quickly is just not going to happen. So, I have to be creative and come up with another alternative or my client will end up spending more money on some beam that they don't need. I miss the days when you could get just about anything you wanted when you wanted it. Today, a contractor has to be even more on top of the job to get things done on time and on budget.
Saturday, September 10, 2011
Komara - Framing
Monday was Labor Day and Tuesday rained almost all day so this has been a short week at the Komara job. Despite that the main floor framing is completed and by the end of the week, so is the main level back pressure treated deck. Everything is looking clean and organized.
 9/8/2011
 9/8/2011
 9/8/2011
 9/8/2011
Word - Framing
The crew is continuing to install the fake rafter tails around both structures while we wait on the antique timbers which, are due in next week. The process is time consuming but things are moving along. The bedroom wing is nearly completely protected by felt paper and almost ready for window installation.
 9/08/2011
 8/31/2011
9/08/2011An inside view of what is the living room and the dormer that will let in much needed light.
8/31/2011I met with two engineers at the site concerning the concrete retaining wall for the driveway. It's been a little bit of a hurdle but I think we are on our way to a resolution and hopefully we can start to form the concrete walls this coming week.
Wednesday, September 7, 2011
Word - Framing
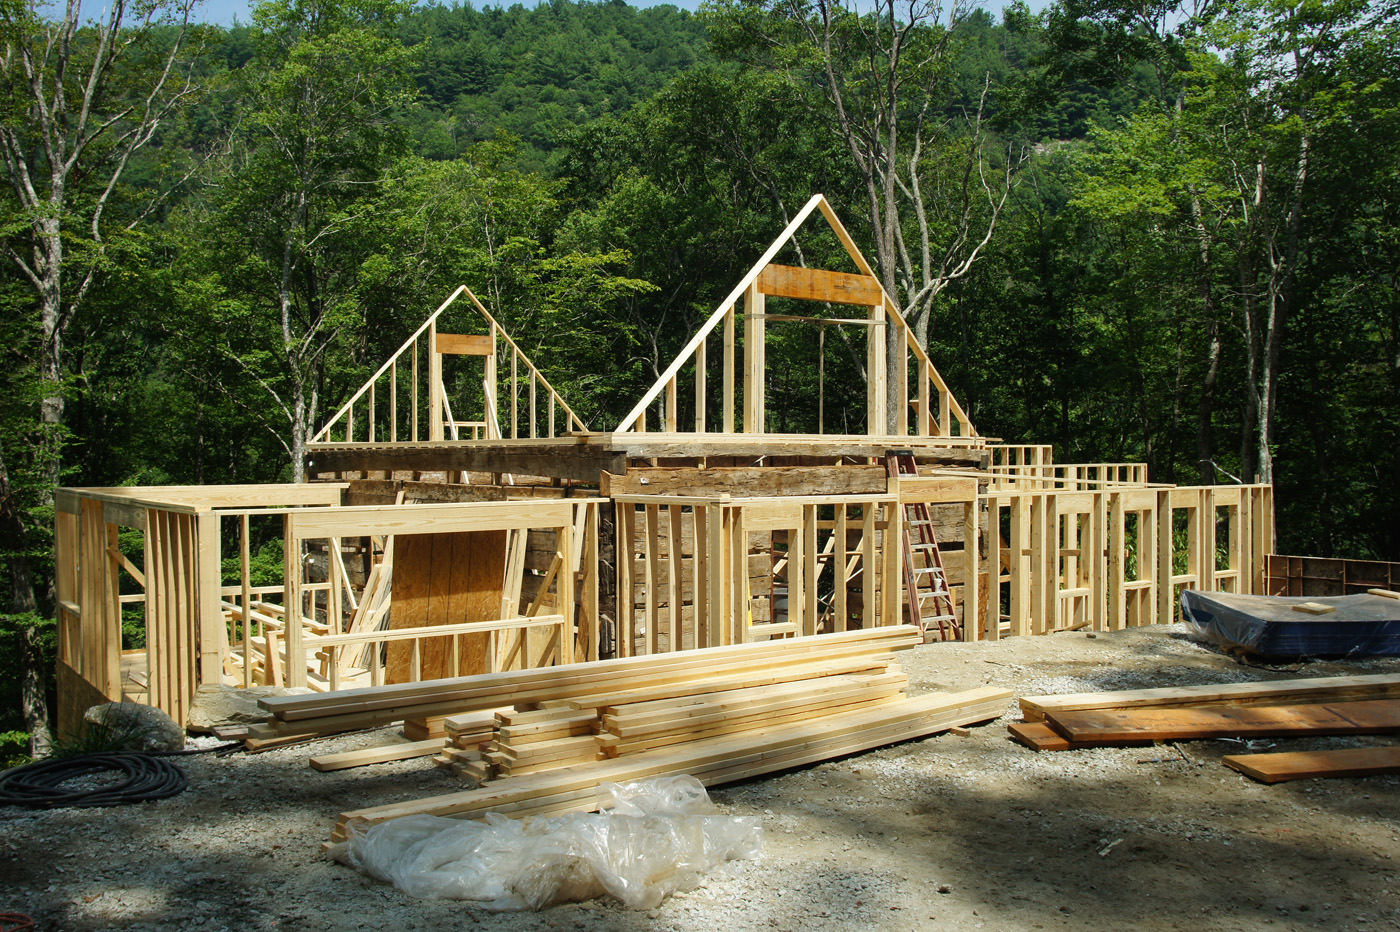
We are about to hit a stopping point or a bottle neck. When working with antique timbers you have to be ahead of the game when determining what you need to order because finding antique timbers and getting them to the site to install is not a task that happens like ordering studs from the local lumber yard. We have a couple of sources that we work with but it seems that speedy response time is not a characteristic common in the antique lumber business. So we are trying to get our timbers for the connector porch and the porch off the kitchen but more importantly then both of those is the tie-logs that the client has decided to add to the inside of the timber structure. Those have to be installed before the final roof goes in so we can use the structure to help pull the timbers into place.
In the meantime we are trying to coordinate the final foundation retaining walls for the driveway. The site is so tight it's hard to coordinate lumber deliveries and getting work done around the excavation work that is needed to pour the last wall, not to mention the dreaded engineering that is needed.
In the meantime we are trying to coordinate the final foundation retaining walls for the driveway. The site is so tight it's hard to coordinate lumber deliveries and getting work done around the excavation work that is needed to pour the last wall, not to mention the dreaded engineering that is needed.
Weather - Tropical storm
Tropical storm Lee hit Sunday and rained clear through Tuesday night. I don't want to complain because we certainly needed the rain, everything was so dry. The rain also hit on a holiday weekend so that was good for work but maybe the tourist won't agree. The temperature did drop after the rain and I think Tuesday night the temperature was in the 50's. That makes me think of what is around the corner...WINTER. I'm thinking we need to get these houses "shelled" in as soon as possible.
Komara - Framing
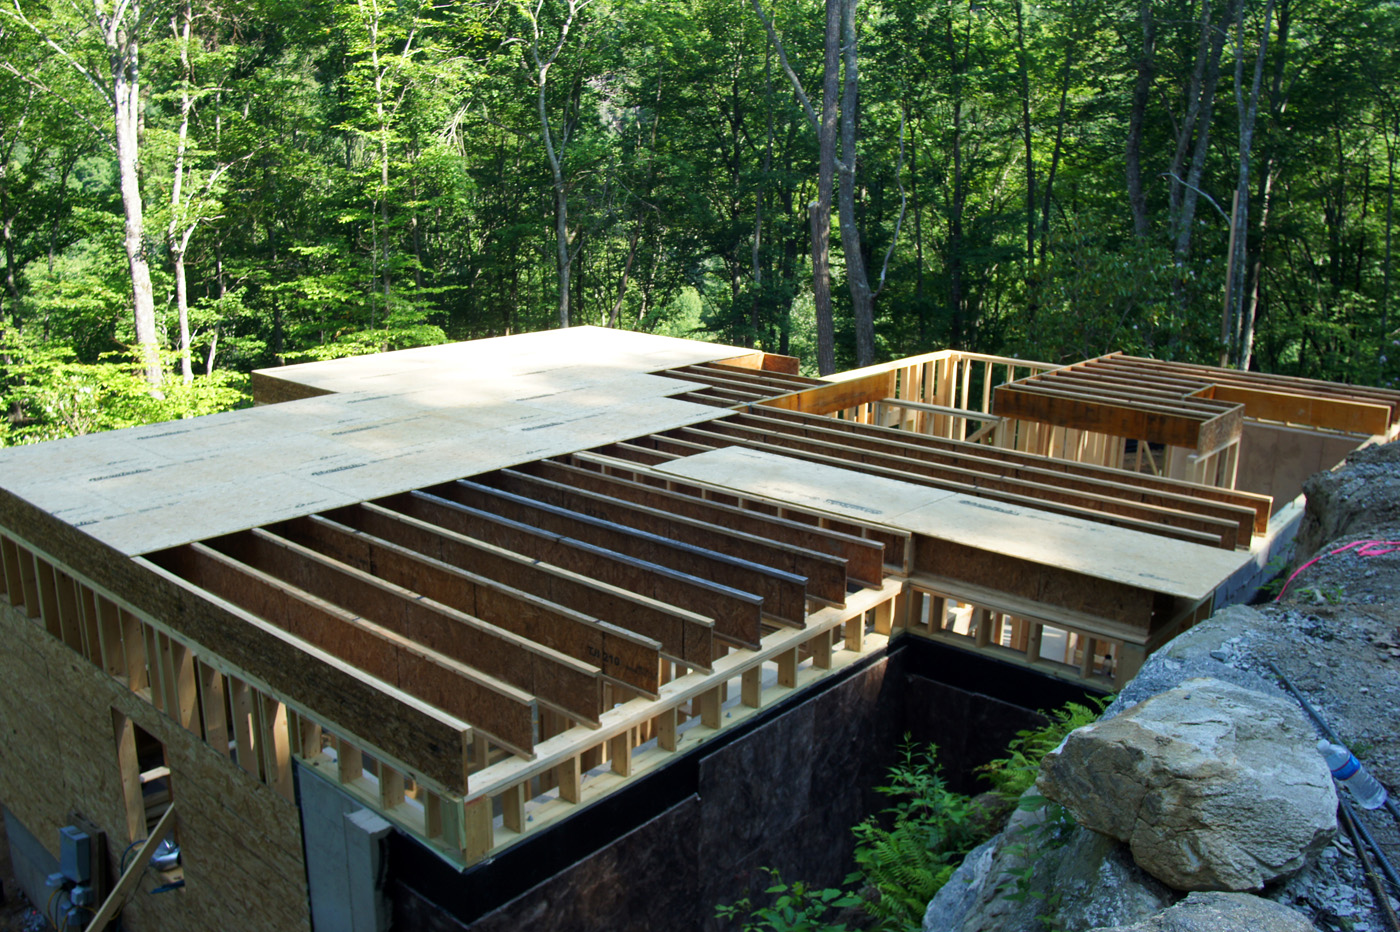
The new floor deck is installed using 14" TJI's and Advantec. The new pressure treated deck is built from 2x10's and bolted to the house every 16". That is more than is required by code but we want to make sure that this deck will withstand any party the client wants to have. The walls are constructed from 2x6 studs and 1/2" osb with house wrap. Soon we will be on to the next level, things are moving along quickly.


Tuesday, September 6, 2011
Komara - Foundations
The new foundation required engineering because the existing foundation consisted of a continuous footer of approximately 4" x 16" and a 6" block wall that did not have the cores filled. I'm always amazed when I see how houses were constructed many years ago and consider the myrid of changes that have occured over the years in order to build a better house, unfortunately it also means a more expensive house.

With engineering we had to dig pier pads around the house, digging under the existing footer and below the frost line, that was reinforced as a column was formed over each pad, all cores were poured solid and a continuous bond beam with rebar was formed around the entire block perimeter. Part of the old wall was torn down because it was not level or plumb and replaced with a poured concrete wall.


With engineering we had to dig pier pads around the house, digging under the existing footer and below the frost line, that was reinforced as a column was formed over each pad, all cores were poured solid and a continuous bond beam with rebar was formed around the entire block perimeter. Part of the old wall was torn down because it was not level or plumb and replaced with a poured concrete wall.

Komara - Demo
Starting the demolition on the existing structure. All of the demolition was done by hand which takes longer. I've been told that in larger cities there are groups of people that will do the demo for you and recycle the materials, using them for habitat house. I think that is a great idea. I wish that we had the ability to do that in our town but our habitat drop-off closed this year.


All that is left is the existing foundation and existing fireplace with chimney. We had to keep some part of the existing structure so that we could continue to use the existing septic system. The new house was designed to retain the existing footprint and keep the same number of bedrooms, otherwise we would have had to install a new septic field.


All that is left is the existing foundation and existing fireplace with chimney. We had to keep some part of the existing structure so that we could continue to use the existing septic system. The new house was designed to retain the existing footprint and keep the same number of bedrooms, otherwise we would have had to install a new septic field.
Monday, September 5, 2011
Kurnick - Septic evaluation
I'm starting to build a new project today. To begin, I visited the lot with the health department employee to evaluate the lot and determine if the current three bedroom septic system that was originally permitted for the lot can be increased to a four bedroom septic field. To give you a little history, the lots were divided up and evaluated for a standard three bedroom septic field in order for the developer to sell the lot but my client's house plan is for a four bedroom septic field so the evaluation needed to be redone. We were lucky in that my clients soil conditions and lot size were perfect for allowing an increase in the septic field size.
Thursday, September 1, 2011
Kurnick - Design
I started a new design project. It started out that the client had a plan that was designed by an architect but after the client sent the plan to bid, they quickly realized the plan was not fitting into their budget. What I find often happens when working with some architects or designers is that they do not know the cost of building and the plan quickly get's out of control. It is difficult when the client has a long list of desires but I always assume that when a client tells me what their budget is, that is the number they want to use as a guide. It is important to always keep that number in mind when designing because certain aspects of the house like complicated rooflines, areas of the house that require too much foundation work, too much square footage, certain framing techniques all create additional cost that could be eliminated with a different design. I try to find the right combination of clients desires, budget constrants, asthetics, flow of the space, lot layout and development requirements in order to create the perfect plan for each client. It's a lot to keep in mind but every item is important and all of those goals must be met in the end. I redesigned the clients plan and now we are ready to move forward.
Friday, August 26, 2011
Komara - Existing Structure
We are starting a new renovation project. The existing house will be almost completely demo'd down to the foundations and keeping the existing fireplace. As you can see from this photo the house was built below the grade of the road so our plan is to make this level a basement and add on another floor.


Word Project - Framing Phase II
I skipped a few photos but we finally finished pouring the footers and walls for the second phase of the construction, the bedroom wing. We have started to frame the floor system and walls. The bedroom wing is at a different level then the main part of the house.
 8/23/2011
 8/25/2011
Word Project - Framing
The floor deck is framed using an engineered 14" TJI joist with 3/4" Advantec. I have used other products over the years like 3/4" osb with a waterproofing sealer or a competing product to Advantec but I haven't found one yet that performs like Advantec. I feel similar about using a TJI floor system.
 6/29/2011
We started to errect the antique log structure. The structure was taken down, cleaned, fumed for bugs, labled and shipped to our site by a company out of West Virginia called Antique Cabins and Barns, http://www.antiquecabinsandbarns.com/
 7/10/2011
 6/30/2011
The log cabin is finished and looks great. Some of the timbers are as thick as 22". No major problems getting the structure up except the top cord is a little bowed and out of level.
 7/13/2011
We started the stick framing around the log structure. To the left is the kitchen and the right is the connector wing for the bedroom wing. Things are moving along.
 7/20/2011
 7/29/2011
Starting the roof framing using 2x12 rafters so that we can insulate according to the codes in our area. The large clear story will allow a lot of light to fill the living room and a bump out window will provide seating for the loft window.
 8/04/2011
Word Project - Waterproofing, slab
The underslab plumbing also ran into the continuing rock problem. The plumber had to rent a jackhammer and chip a trench in order for the sewer line to have the correct slope/fall to the septic tank.
 6/1/2011
 6/09/2011
 6/20/11
 6/1/2011
The waterproofing and foundation drain was completed on the first phase of foundation wall. The drain was covered with filter fabric and covered with gravel. We will lay more gravel before we backfill.
 6/09/2011
The slab was poured and brushed smooth. The slab will eventually be stained and sealed as the final finish.
 6/20/11
Thursday, August 25, 2011
Word Project - Foundations
The footers were difficult to form due to the rock, again. Some of the footers could be dug into the soil and other parts needed to be formed on top of the rock. The inspection department allows us to chip the rock to a level area for the footers to rest and then we can avoid drilling rebar into the rock.
 04/28/11
The footers were poured. I took this picture and edit it to look "mini"
 5/18/11
 05/21/11
 04/28/11
 5/18/11
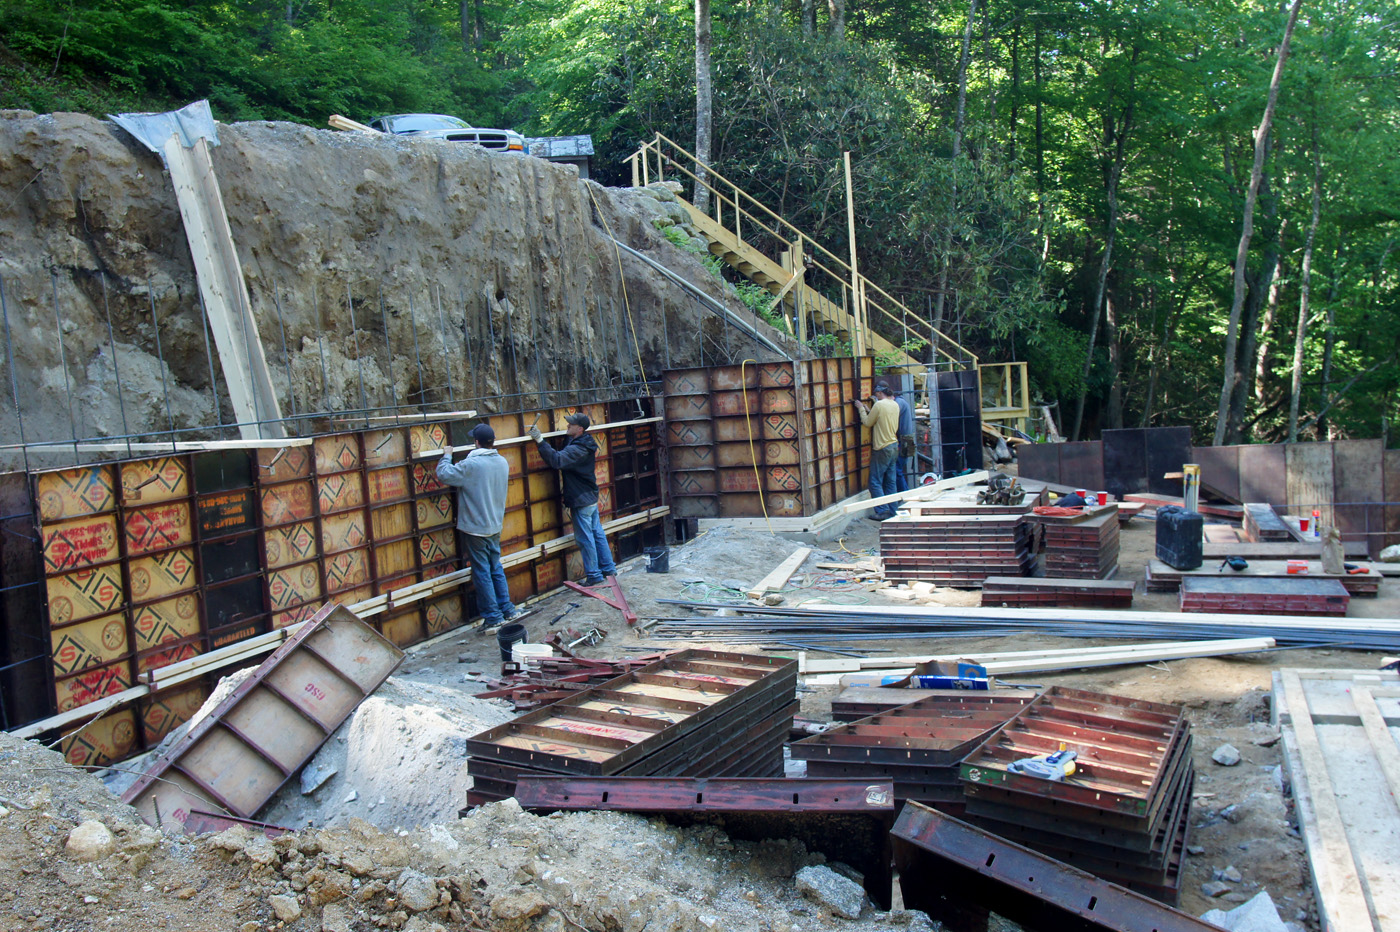
The forming panels for the walls are being set up. Doing poured walls in the mountains is not an easy job. The forms are heavy and need to be carried, usually down a hill and then connected. Soon we will be ready to pour the walls but we have to do the pour in two phases due to the lack of space to work, park the concrete trucks, stage the forms and dig out all the excess dirt.
 05/21/11
Word Project - The Site
We have started a new project in April 2011. The scope of work is to excavate the site, install a septic system for the house, pour foundations, frame the house including re-errecting a deconstructed antique log cabin and do the final trimwork to achieve the certificate of occupancy.
The site is not easy to access. The drive is several miles back into the woods, up and down steep hills which will not be pleasant to get to this winter. The house location is a small knoll that we have to squeeze every bit of this 4000 sqft house from side to side.

Rock retaining wall to support back yard. The hurdle is that the slope is so dramatic we have to find a happy medium so we build up the back yard and cut down the front yard.

Of course we hit rock in the middle of our site. We couldn't blast with dynamite because the client has another cabin close on the property so we had to use a powder product that when mixed with water it expands and cracks the rock. A hole is drilled in the rock and the powder mixture is poured inside. It works but it is a slow process.
Subscribe to:
Posts (Atom)